Showing posts with label crafty creators. Show all posts

Friday, August 18, 2023

Crafty Creators


 I have already started my handmade Christmas cards for this year.  If I don't start now, I won't finish.  If I try to do them too quickly, I'll get burned out and buy store bought cards.  But people expect handmade cards from me, so I do them a few at a time.  Lately I've been fascinated with watercolor, so I watched a tutorial by "Cool Cakes and Crafts with Amalia" and copied her design the best I could, with her permission of course.  Here is my version:


The sleigh, horse, sentiment, and snowflake are  die cuts I made with my Cricut, but the sky, shadow, and snow are watercolored. What do you think?

Link up with Crafty Creators for more crafty goodness and inspiration.

Thursday, July 27, 2023

Crafty Creating

 Visit Crafty Creators for awesome diy, decor, recipes, and more!


This week I made each of my granddaughters castle shadowboxes using a cut file I purchased from The Bearded Housewife.  These were so much fun! They will likely be Christmas presents.  I hope they love them!


Saturday, December 31, 2022

Crafty Cardmaking


My friend's birthday is on Christmas, so I always make sure to asknowledge it as her birthday.  I made her this card and gave it to her, and I think she liked it.  I thought it was cute!  Again, I took an idea from Pinterest and put my own spin on it.


Materials Used

Cricut Maker (any cutting machine will do, including the Explore series and the Joy)


Solid white cardstock


Solid black cardstock


Patterned paper from my stash

An A2 folding card and envelope


a bone folder


Mini Xyron (I already had it, but I needed refills)


Bearly Art Precision glue


Measuring tape


If you make cards, I'd love to see your creations!

I'm linking up with Inspire Me Monday and Crafty Creators.


Some of these are affiliate links meaning if you choose to make a purchase, I may receive a small compensation at no extra cost to you.  This is not a sponsored post.

Friday, December 02, 2022

Crafty Fun


 Hello!  Well, I am slowly, but surely, getting out of my funk.  I'm still sick, but a lot better.  I lost some time with this illness!  I have things to do! 


Remember this Sweet Brown meme from 2012?


I did make time to make this canvas for our daughter's birthday next week.  She and I have loved Harry Potter since she was a little girl (she's almost 30 now).  The midnight premiers were "our thing."  And we both still love HP and everything related.  I think she is going to like this.


This is the first time I have used heat transfer vinyl on a painted canvas, and I'm really proud of how it turned out.  I took three designs from Cricut Design Space and incorporated elements from both and used Hufflepuff colors.  I ordered a wooden easel to set it on.  I can't wait to give it to her!


Materials Used:

6 inch square canvas

Apple Barrell acrylic paint, Territorial Beige

Foam paint brush

Siser heat transfer vinyl (various colors)

Heat press

Heat press mat

(Some affiliatelinks-If you make a purchase, I may receive a small commission at no cost to you. This is not a sponsored post.)

I'm linking up with Friendship Friday, Christmas Crafts and Decor, and Crafty Creators.  Visit them for more crafty fun!

Friday, November 18, 2022

Sewing boxed corners


There is more than one way to "box" the corners of a homemade tote bag, but only one of them would work for the  way I wanted to make reusable grocery bags for my daughter.  The reason is that I wanted to start with one long piece of fabric instead of two separate pieces, so I would not have a bottom seam to work with.

After sewing the main piece of the bag, line up your seams until your bag comes to a point at the bottom kind of like the opposite of the way your would actually carry it.. The trick to making sure your corners are even is to make sure the side seams are exactly even.  You can also measure the marks you make on each side to double check that they are even.


Measure half of what you want your box to be.  For example, I wanted my box to be 5 inches across the bottom, so I measured up 2.5 inches from the corner tip, and marked it.  Using a ruler, I made a straight line.  (Same thing on the other side.)  Sew across the line, trim the excess, and check out your handiwork.


I'm pretty happy with the way it turned out.

I am going to iron on a design on the front and back of each bag, so I will show it again when it is completely finished.

For more crafty goodness, visit Crafty Creators, Friendship Friday, and Happiness is Homemade.
 

Friday, November 11, 2022

Crafty Sewing Time-Pocket Wall Hanging


A few days ago, I was looking through Amazon trying to find something I could hang on the wall of my craft room that had pockets.  I had been using my daughter's old hanging jewelry organizer. It was working okay, but I decided to reorganize my supplies to be more efficient, and it was simply taking too much room.  As I searched Amazon and Google shopping, I realized I could make something!  So, I did.  These are the fabrics I used.

Pink print at the top as pockets, pink roses for the main front, and solid pink for the slip pocket and back.

I didn't create a pattern.  I just knew I wanted to start with 12x14 fabric, one for the front, and one for the back.  I knew I needed interfacing, so I ironed it on the wrong side of the front fabric.  I wanted four pockets, and I wanted them shaped like the bottom half of a stop sign, like this...

This would give them some shape and more room because instead of sewing it down in that shape, I scooted the sides in until they were almost vertical, pinned, and sewed.  I decided I wanted a slip pocket at the bottom.  I just ironed some interfacing in between two 12 inch wide pieces of fabric then sewed some leftover bias tape along the top edge of the pocket.


I decided to make ribbon tags to hold the woodent dowel, and I used the ribbon as a hanger as well.  When the four pockets were finished and the ribbon tags pinned.  I put the two main pieces with right sides together and sewed all the way around the rectangle except for a small space to use for turning.


After sewing and turning, I pressed my wall hanger.  Then I topstitched about 1/8 inch all around making sure to catch the open seam I had used to trim it. I love how it turned out!  All I had to do was put the dowel through the tabs then take one long piece of ribbon and tie it to both ends.  It's ready for hanging!


The exact materials are listed below.  They are affiliate links meaning if you choose to make a purchase, I may receive a small commission at no cost to you.  This is NOT a sponsored post.

Materials:

front fabric 12x14

back fabric 12x12

4 smaller pockets with 3 inch bottom (came from the same bundle as front fabric)

slip pocket fabric (same as back) 12x4.5

Bias Tape (optional.  I already had some that matched)

Interfacing

Grossgrain ribbon

Wooden Dowel 12x3/8 inch

Thread that matches

Sewing Machine

Fiskars Fabric Scissors

Press Perfect Hot Ruler (This might be my favorite sewing supply.)

Pins or Clips

Iron and Irony Pad or Board

For other crafty posts, link up with Crafty Creators or Happiness is Homemade.

Thursday, November 03, 2022

Crafty Friday


Hello!  I finally created a craft blog and named it Crafteverly!

If you know me , you know I love to craft!  I enjoy sewing, Cricut , wood, vinyl, paper, and so many other types of crafts, and I love creating  digital items as well.

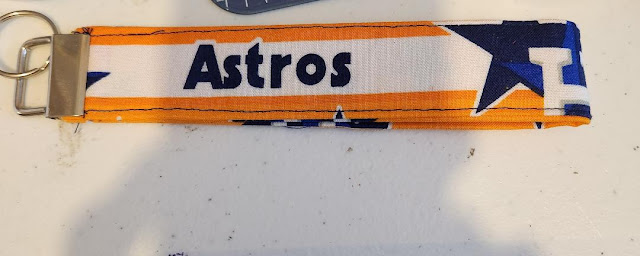
I've finally opened an Etsy shop, but I only have two digital products uploaded so far, but I'm working on it!  Right now, I want to show you a key fob I made to support my hometown team the Astros.  You can make it using any fabric.  I just happened to have this fabric from when I worked part time at Jo Ann.


I also have to take better pictures before putting them in my shop!

This is super easy to make.  You need the following:

12x4 piece of fabric

12x4 piece of lightweight, fusible interfacing

iron and ironing board or ironing mat

any sewing machine

thread

key fob hardware

pliers

First, you iron the interfacing onto the wrong side of the fabric.  Next fold the fabric in half longways and press.  Open it back up.  Fold one side of the fabric in toward the middle and press.  Repeat on the other side.  Now fold in half again and you should have fabric that is 12x1 with all the raw edges on the inside.

Now take it to the sewing machine and sew a 1/8" straight stitch all the down the open side to close it up.  Then sew a 1/8" straight stitch down the other side so they match.  Now fold in half bringing the two ends with raw edges together.  Baste the key fob in place where the two ends meet.

The last thing to do is to use your pliers to attach the hardware to the fabric making sure not to scratch the hardware.  I used pliers that were made for this purpose as they have a rubber tip on them.  Add keys, and you're good to go!

Here are some others I made:

Thank you for visiting, and visit Crafty Creators and Friendship Friday for more crafting fun.


Links for materials are affiliate links to the exact products I used.  If you choose to purchase from one of my links, I may receive a small commission at no cost to you.  This is not a sponsored post.

Friday, October 28, 2022

Crafty Scrapbooking


Here are some scrapbook pages I made when my sister and I went on our retreat.

The first one is from when our first granddaugter was born.

Materials


The second one was from our youngest daughter's wedding, and it's a double page layout.

Materials Used
Matting Paper from my stash
Metal Cross brad from my stash
Bling shape from my stash

I hope you liked my pages!

Some of these links are affiliate links.  If you click and make a purchase, I may receive a small commission at no cost to you.  This is not a sponsored post.


I'm linking up with Inspire Me Monday, Happiness is Homemade, and Crafty Creators,  I will link up with Friendship Friday when it is up and runnin regularly again.

Friday, October 21, 2022

Crafty Friday-An Update and Handmade Key Fobs


Whew!  My first post this week!  It's been a little crazy around here.  My sister and I were on our girls' trip.  We have done at least once a year since my dad passed, sometimes more than one.

On the last day of our trip, our mom took a fall.  We were able to see what happened on the camera we installed in her "apartment." When we got back from our trip, I went straight to the hospital.  She ended up only having to stay one night, but we have been visiting her more often since then.   She had multiple tests and blood work, but nothing is broken, and they aren't concerned it caused any damage. Thank goodness!  My father-in-law (age 93) has had a few scares recently, too.


My sister had her six-weeks-after-chemo and radiation CAT scan.  All clear for now!  Repeat in six months.  I pray it stays that way.

My blood pressure has gotten out of control.  I'm starting a new medication and I have an echo-cardiogram (not the same as an EKG) on Saturday.  Yes, Saturday.  Weird, right?  I was born with a bicuspid aortic valve, so I have to get checked every so often.

Now the fun part:

I made these key fobs!  It was super easy!


Actual materials used:

To make it, cut a 12x4 piece of fabric and 12x4 piece of interfacing. Fuse the interfacing to the back of the fabric.  With right side down, fold fabric in half longways and press.  Open up the fabric and turn each side to the middle and press.  Fold over once more and press.  Sew a straight stitch along both sides of the fabric. Fold so that you bring the two raw edges together and press.  Sew the short raw edges together to make a loop.  Give it one final press.  Attach the hardware, and that's it!

For more crafty fun, visit Friendship Friday, Happiness is Homemade, and Crafty Creators.

Have a great weekend!


Some of the links in this post are affiliate links.  If you decide to purchase something through those links (from Amazon), I may receive a small commission at no extra cost to you.  This is NOT a sponsored post.

Friday, October 14, 2022

My Favorite Scrapbook Page (this week)

 I am at a crafting weekend right now, and my sister and I have been scrapping weddings (my daughter's, her son's).  Here is my favorite page so far.

Click to see larger

The materials I used:

Stamperia cardstock paper from the New England pack (pictured above my page)

Design Cut with a View solid shimmer pager

1 small lace doily

Doodlebug Design Fancy Frills cardstock stickers (white) 

Ribbon from my stash

Flower from 49 and Market Flower Mini Series 1-Cobalt (also from my stash)

Plain white cardstock from my stash

Adhesive glue tape runner

Aleen's clear gel tacky glue

Pearlized blue gems

Ruler

Cricut Metallic Blue 1.0 gel pen

Cricut Maker (any cutting machine will do)

I hope you like my page.  It was so much fun creating it!  I'll be sharing with Friendship Friday at Create with Joy and Crafty Creators at Life as a Leo Wife.


Some of the links in this post are affiliate links.  If you choose to make a purchase, I may receive a small commission at no cost to you.  This is NOT a sponsored post.

Friday, October 07, 2022

Fleece Baby Blanket

 Hi friends.  As you may know, I have another granddaughter, so I just had to make her a blanket!


I used a remnant I got at JoAnn a while back.  It was an unusual rectangular remnant which would have looked funny, so I ended up cutting it in half meaning it has a seam in the middle and the elephants don't match up there. It's still a rectangle, but the dimesions are more suitable now. For the back, I used some soft gray fleece.


I usually sew on flannel rather than fleece, and fleece is so much thicker that I had to use my Walking Foot (the same type you would use for a multi-layered quilt).  Otherwise, it was too difficult to get all of the fabric to feed under the regular foot.  I tried it.  The walking foot worked much better!

I want to make myself a shirt with this adorable  design from Creative Fabrica.

If you're a crafter, you really should check out Creative Fabrica for affordable designs!

Visit some more creative friends at Friendship Friday and Crafty Creators.

Have a great weekend!

Some links within this post are affiliate links meaning if you make a purchase, I may receive a small commission at no extra cost to you.  This is NOT a sponsored post.

Friday, September 30, 2022

Crafty Storage Solutions


Hi friends.  I have been very busy restructuring my craft room to make it easily accessible for all of the different crafts I like to do.  I would say that my top three crafts are scrapbooking, card-making, and sewing.  (I also love to make things with wood and canvas.)  My storage of certain items just wasn't working for me.  I had to find some solutions so this doesn't happen:

  First,  brads.  I have different types and colors, and they are small and easy to lose, so I have to have a failproof way to store them.


  I used to keep them in a sort of tackle box type container, and I thought about going back to that, but the box was actually too big. Brads are small.  I've been keeping them in tiny zip bags in some clear jewelry-type boxes on my table. 
My solution is going to be to store them in these clear Fab Lab Containers and store the containers in a clear plastic bin  like these so I can see at a glance what I have and grab what I need.


(I already have them, so I didn't purchase anything new.)  I'm also going to store my stamp pads in one of these because they have outgrown the bin they are in now.

Next on my list is card-making supplies such as card fronts, folded cards, and envelopes, all in different sizes.  I decided to purchase a bin that has 6 tabs built in tabs. 


I can put them in the box and have them right at my fingertips (with labeled tabs) instead of having to dig through the photobox where they are now.  

 I am also using one of these square boxes for my patterns.  My patterns fit nicely into the medium sized plastic envelopes sold by scrapbook.com.  The medium envelopes fit nicely in the box above since the box also came from Scrapbook.com.


I have already organized my fabric into two large totes.  I folded the fabric around cardboard pieces so that I can see everything that I have at a glance and in color order.

Next, my thread and sewing notions.  Instead of this...

I've purchase an actual storage bin that is made to hold thread.   I purchased this at JoAnn.


Last, I need a solution for my embellishment flowers like these.

 I've been storing them in little buckets hooked to the bottom of my pegboard.


The buckets are cute, and I have easy access to them, but I don't like not being able to see what I have.  They are divided by color, which I like, but they could also be gathering dust.  I  watched a video today of a scrapbooker who keeps hers in plastic zip bags, but she never said where she kept the bags, so I'm open to all ideas!


My goal is to have my craft room organized so that I can easily find everything I need, and these were problem areas. I've already tamed the paper, punches, adhesives, stencils, pens, kits, and photos.  When I finish this round of organizing, all I will have left to organize are the flowers.  Any suggetions?

I'm linking up with Crafty Creators and Friendship Friday.  Come find me there!  Have a great weekend!

Some links are affiliate links, and others are not.  If you click through to purchase a product from an affiliate link, I may receive a small commission at no extra charge to you.  This is NOT a sponsored post.